
The Keyboard Build Part 2: Firmware and keymap
In the last post, we researched out options and eventually settled on building a Levinson mechanical keyboard from Keebio. This keyboard is a "40%" keyboard, which was specifically chosen to fit the limited space of my Varidesk convertible standing desk. Assembly was relatively straightforward, although we weren't able to test anything just yet.
A keyboard is more than just a collection of switches, resistors, and a few pretty lights. It needs a brain. In the earliest computers and industrial equipment, the computer itself read the state of each key switch directly. Not only did this "steal" CPU which could be otherwise used elsewhere, it made creating keyboards that were interoperable across many computers impossible. Many USB keyboards today have a dedicated integrated circuit (IC) to translate the electrical signals from the switches to data that a computer can understand. While we could use one of these ICs for our DIY keyboard, many opt for a more intelligent, versatile, and available component instead: A microcontroller.

The microcontrollers, or "micros", are in many ways mini computers. They have their own memory, operating system, input, and output devices. Instead of installing applications, however, you write a dedicated program and compile it as a new firmware. This is then uploaded to the micro so it can be put to use.
The Levinson keyboard tutorial I was following strongly suggested programming the micros first prior to installing them. This seems counterintuitive, but there's an excellent motivation for this. As complex components, the rate of failure for a micro is higher than for simpler parts like the switches. Programming them first allows you to be confident they work, without needing to desolder a defective component.
The Levinson runs a popular, open source firmware named QMK. While the build tutorial doesn't go into detail about compiling and uploading the firmware, it does refer you to QMK's excellent documentation. On a Mac or a Windows machine, you could use an graphical application to build and customize the firmware. Since I'm running Linux, my only option was to try to compile the firmware using the command line.
This...can be challenging. Linux, in some ways, is a more strict operating system in terms of security than other desktop OSes. I've had difficulty programming micros before, but somehow I managed with the Teensy Thumbboard. After reviewing the docs and finding what packages to install on my laptop, the programming steps were surprisingly simple:
- Hold down the micro's reset switch.
- Connect the micro to the laptop via USB.
- Use the
makecommand to compile and install the firmware.
Almost immediately, there was a snag. The make command for QMK requires a key parameter in order to know which keyboard firmware you're building. QMK, supports multiple keyboards, each with slightly different configuration options and other details. The command takes the following form:
make firmware:keymap:variant
Where:
- firmware is the path under the keyboards/ directory of QMK to your specific keyboard.
- keymap is the name of the keymap for your firmware
- variant describes a particular variation of your keyboard, or micro. It depends on what the firmware supports, and is often optional.
After digging around, settled on the following command:
make keebio/levinson/rev3:default:dfuThis...didn't work. No matter how many times I tried to flash the firmware to the microcontroller, it was as if the micro wasn't connected to the laptop. Even bypassing permissions by running the make command with sudo didn't help.
I was completely stumped, and then I noticed something.
In the build guide for the keyboard, the microcontroller had a black circuit board. The one's I had were blue. While this could just be an difference in color alone, I suspected that instead, I didn't have an "official" Aruduino Pro MIcro, but rather, a clone. While a clone micro would have the same footprint, pinout, and generally the same electrical characteristics, there are minor incompatibilities. One of the biggest ones is the toolkit used to compile new firmware. It's frustrating and annoying that hardware manufacturers continue to weaponize intellectual property in this way.
As I continued to research, I also discovered I didn't need one command to create the firmware for my keyboard but two. Each half of the keyboard has it's own microcontroller. The two communicate with each other through a TRRS cable, a four wire cable similar to a 3.5mm stereo cable. Thus, each micro on each side needs a slightly different firmware in order to function correctly. As a result, I needed two make commands:
sudo make keebio/levinson/rev3:default:avrdude-split-left
sudo make keebio/levinson/rev3:default:avrdude-split-right
This time the firmware flashed (uploaded) to the micro without issue. It also turned out that it wasn't necessary to hold down the reset switch, then connect the micro to the laptop when flashing. Instead, you can connect the micro prior to running any command. The make command will then helpfully ask you to press the reset switch so it can begin uploading the firmware. A few minutes later, I had programmed both and proceeded to solder them into the keyboard.

Now came the big moment, time to power on the keyboard and use it for the first time. As soon as I did, however, it was obvious something was wrong.
One side of the keyboard flickered wildly, while the other barely worked and seemed to register incorrect key presses. At least the all the LEDs were soldered in the right way...
After watching the behavior for a while, I noticed that the flickering of the left side of the keyboard changed in intensity and frequency when pressing keys then when I wasn't. This was another clue the suggested to me what might be wrong. The LEDs were likely controlled by one pin of the microcontroller, while all the switches were on other pins. The way that the keyboard was working now suggested that all the pins were wrong, and that key presses were being sent to the pin connected to the LEDs.
But how could that be? This keyboard wasn't an original creation or a modification of an existing board. This can't possibly be a design problem, it had to be something I did.
And indeed, it was. The version of the Levinson I was building was an older revision -- rev 2 to be specific. When I composed my build commands for the firmware, I simply assumed I was using the most recent version of the board that was in the QMK project -- rev 3. The two versions are very, very different and the firmware isn't compatible. Both used the same microcontrollers, however, so I was able to upload the firmware with no problem.
So, the solution was to upload a new firmware for the correct version of my keyboard. Easy right? I went back to the QMK project and found the correct version to run:
sudo make keebio/levinson/rev2:default:avrdude-split-left
sudo make keebio/levinson/rev2:default:avrdude-split-right
But wait! I already soldered the microcontrollers to the keyboard. While one of the reset switches were easily available with the keyboard cover off, the other micro was intentionally soldered upside down, meaning the switch was inaccessible. Fortunately, the keyboard itself provides an auxiliary reset switch for this purpose. This allowed for the keyboard to be programmed without disassembly.
This time, the keyboard didn't light up as I had hoped, but a few tentative keystrokes revealed that yes, the keyboard was in fact working! I was missing having all the pretty LEDs, however. Obviously, those are disabled by default to save power. A keystroke of some kind would need to be used to turn them back on again.
I went back to the QMK code on my laptop and dug into the directory for the Levinson. There, I found a keymaps/ directory with three files.
qmk_firmware/keyboards/keebio/levinson/keymaps/default
    ├── config.h
    ├── keymap.c
    └── rules.mk
Despite keymap.c being C code, it is very, very well commented and easy to understand. ASCII-art pictures of each keymap are available for different layouts and layers. These layers allow for additional special characters to be typed on the Levinson by holding down the raise or lower keys. In addition to adding the keys to control the backlight, I also needed to account for my space keys. Instead of a single switch's worth of space on the keyboard, my space keys take up two. This required changing the keymap.
Instead of modifying the default keymap further, I copied the directory and created my own. This way, I could upload my copy of the firmware to a public git repository such as Gitlab for future modification. This also resulted in changing the command slightly once more:
sudo make keebio/levinson/rev2:socketwench:avrdude-split-left
sudo make keebio/levinson/rev2:socketwench:avrdude-split-right
Once the new firmware was uploaded, I used the new key sequence I programmed to turn on the LEDs. Lucky for me, they did!

Now that the keyboard was working as expected, I started to wonder just how much power the thing drew with the lights off, on, and at their brightest levels. Each LED requires an amount of current to work, as do the micros and the other components.
Fortunately, I have a USB in-line power meter. This device acts as a small, electrical multimeter but for USB devices. It allows you to measure the voltage, amperage, and power the USB device is using simply plugging it inline between the computer and the device. The meter shows measurements on a tiny, built in display. So, I decided to try it out.


From what i could tell, the keyboard requires almost a quarter of a watt to run when the LEDs are off. While this is higher than a lot of keyboards, it makes sense as we are powering two microcontrollers. Turning on the LEDs to their lowest level consumed anywhere from another 20 to 40 milliwatts. This put the overall power consumption for the keyboard below a third of a watt, which was surprising. I would have expected each LED to draw much more.
Not being deterred, I decided to crank up the brightness to the maximum level. This is...unusable for me in practice, but it was fun anyways. As the brightness ramped up, I was consuming nearly a watt of power through the keyboard alone.

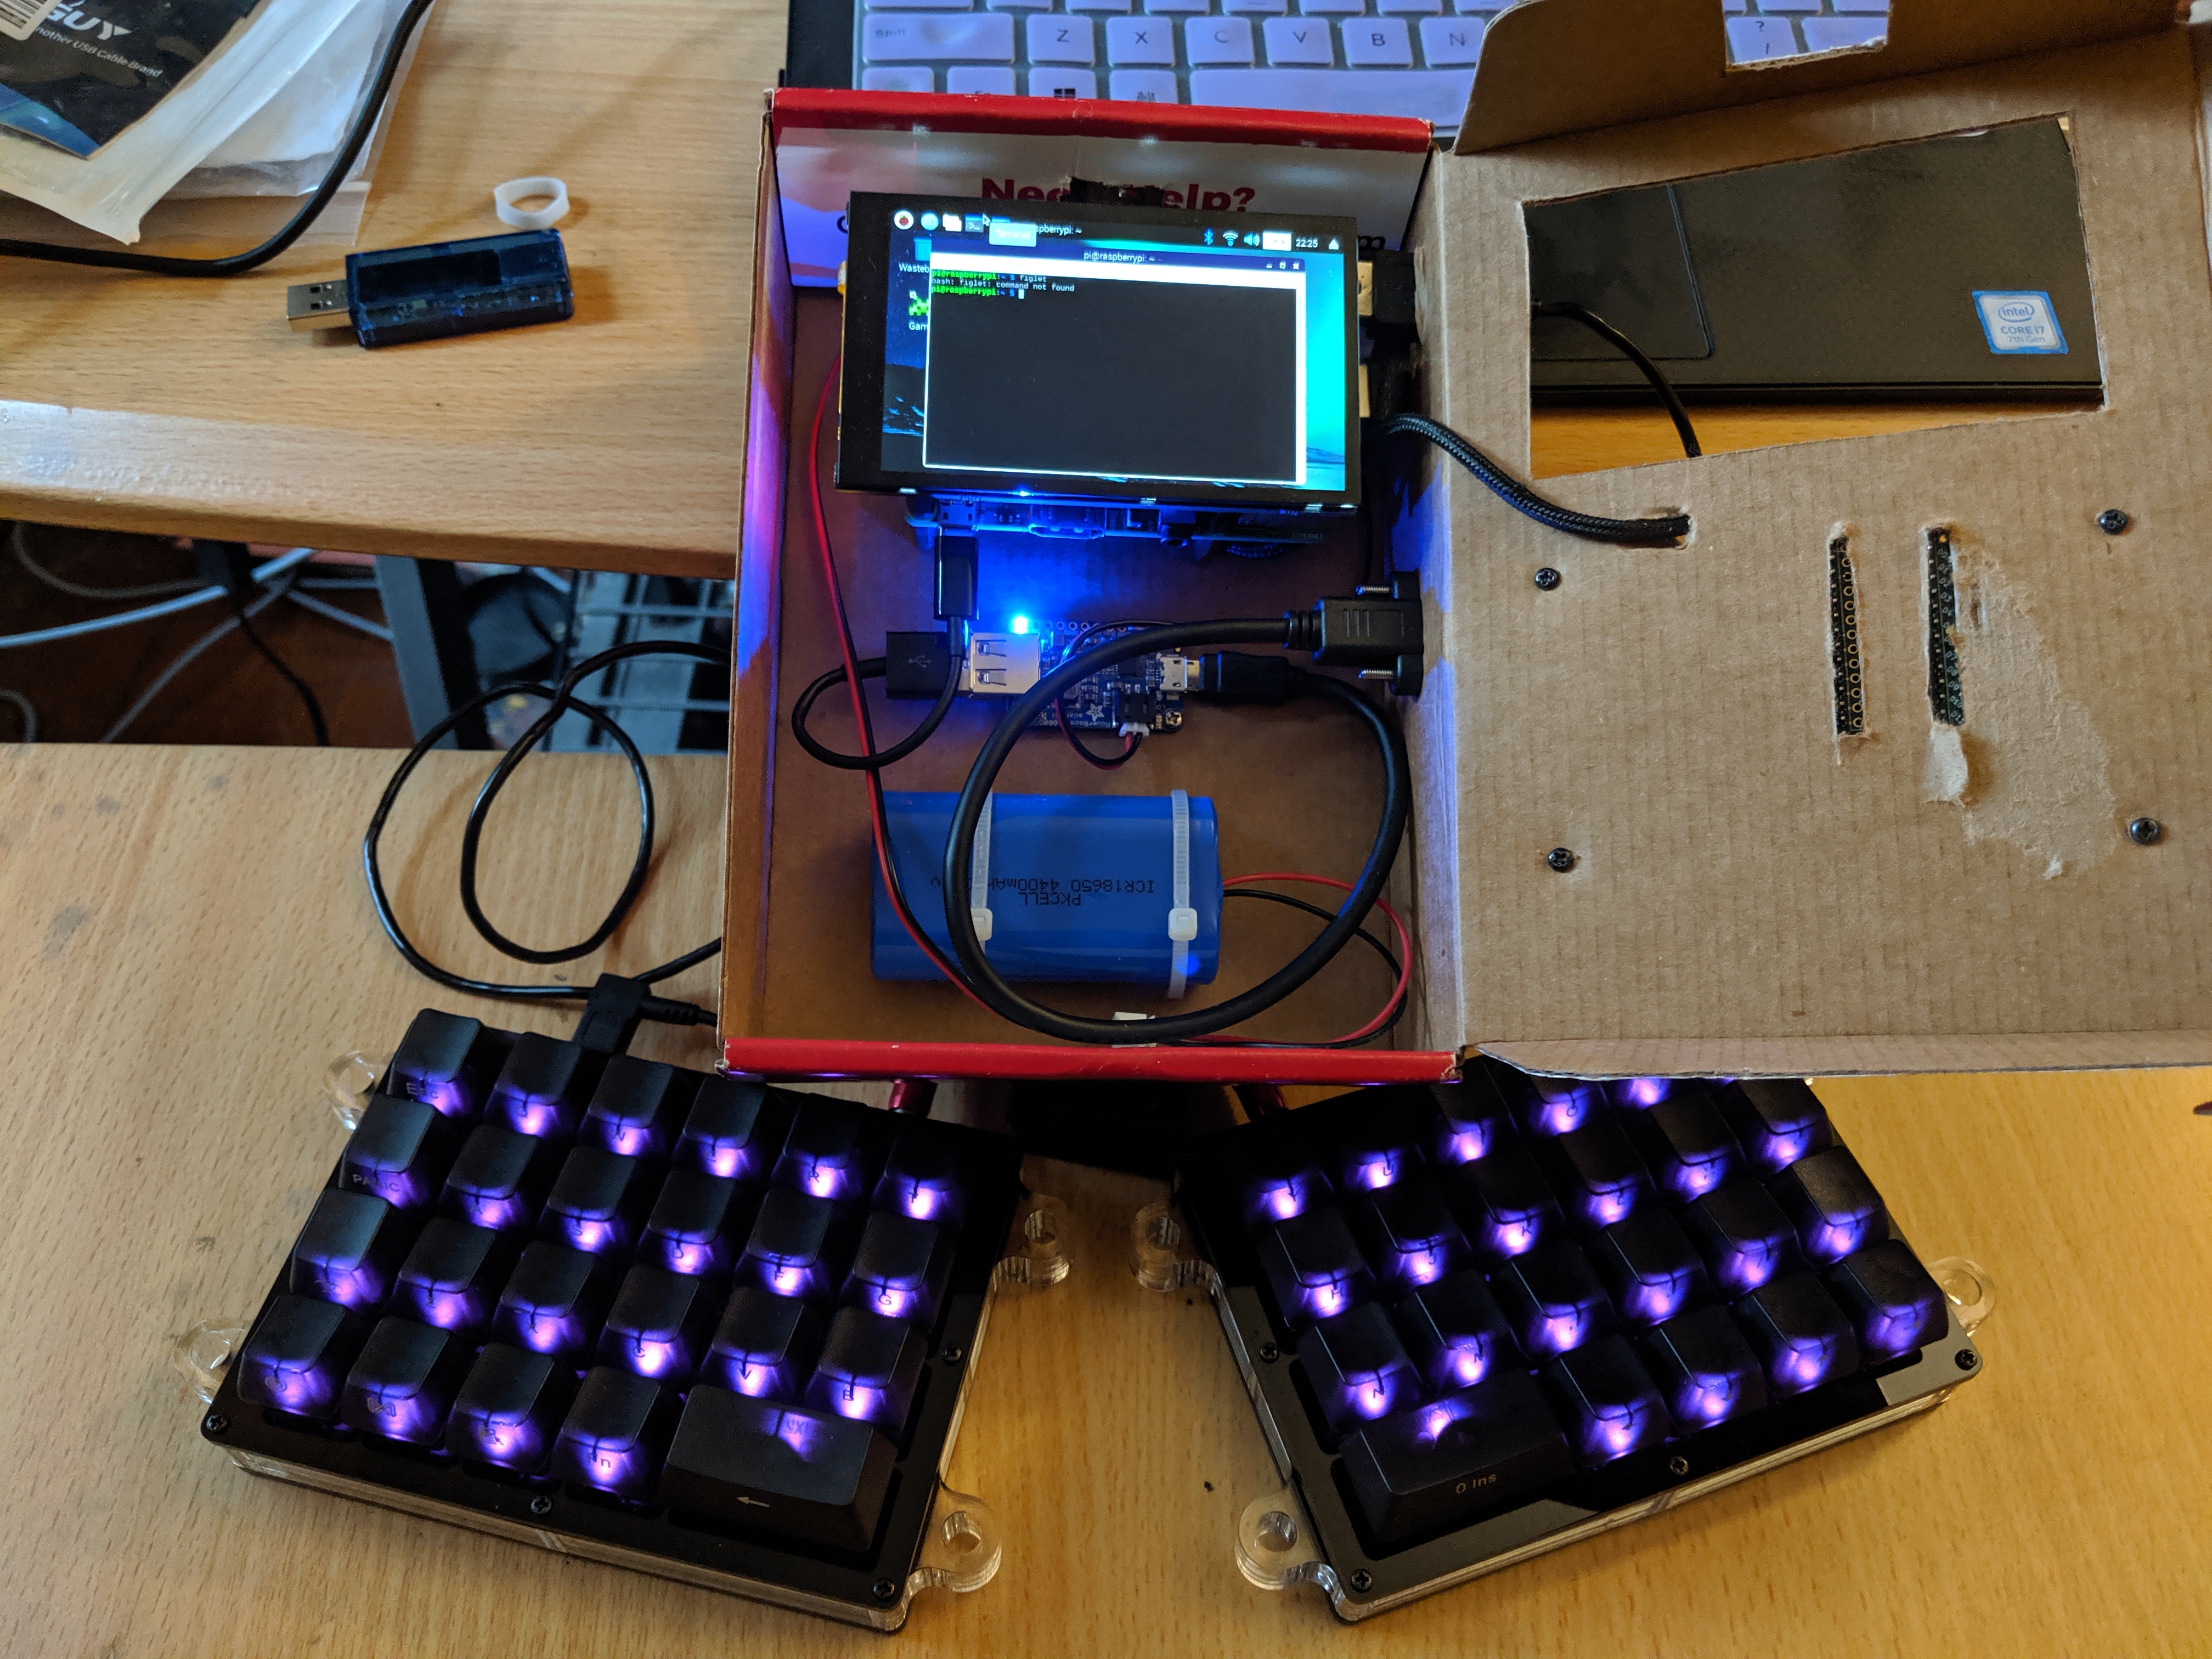
Now that I knew what the power consumption was like, I guessed I would be able to use the keyboard with my DIY handheld computer, the Cardboard Pi. Powering the keyboard was certainly possible for the little computer, but it was clear that this was a taxing power drain. One side of the keyboard often did not power up. Still, it was amusing to connect a DIY computer to a DIY keyboard, like some sort of hardware hacker out of Neuromancer.

A week after using the keyboard, I decided to try to complete it using the last of the parts I had ordered. In addition to lights under each key, I also ordered an "underglow" kit, which shines lights under the keyboard onto the desk to create a halo effect. Underglow has become a popular alternative for DIY keyboards compared to under-key lighting as fewer LEDs are needed, plus microcontroller-friendly RGB lights can be used for more dramatic and colorful effects.
I never had a keyboard with underglow before, so I decided to give it a try this time. The kit was very simple. Two strips of RGB LEDs are provided. Solder the strips to key terminals on each board, and power it on. This sounded really easy, but I ran into so many problems.
Soldering wire to the LED strips was a challenge, and I often ended up damaging in the connectors as the lead-free solder refused to stick to the pads. Mechanical stresses from the wires also often broke the connection or even tore off one of the pads completely. After much frustration, I was able to get all the wires connected. On power-up, only some of the lights worked correctly, and the keyboard itself seemed to malfunction.
I could have taken the time to troubleshoot it, but I decided to remove the underglow instead. With the way I was using the keyboard in the last week, I didn't see much benefit of having the underglow. I seem to prefer my keyboards to be as low to the desk as possible.
So how is life with the new keyboard? To be honest, it's a bit of a mixed bag.
My fingers are still not used to the ortholinear or the 40% form factor. Often, I fall back to my full-sized keyboard for the sake of speed when I need to type. Furthermore, the height of the keyboard itself from the desk proved uncomfortable. I would often need to work my wrists harder to keep them above the desk. A temporary wrist rest seemed to help, but only so much.
When I needed to write software code, typing became even more frustrating as multiple key sequences were required for the myriad of special characters required. I began thinking that I would do better with a 60% keyboard which included a number row. Something like the Helix Keyboard may solve both of those problems, but that would be a project for another day.
When I do use the keyboard, however, it does help some of the side-to-side wrist strain. And the tuned keys really make my fingers happy. If it weren't for the other shortcomings, I would have never gone back to my regular board.
All parts and materials to make this project were paid for my supporters. If you like this post, consider becoming a supporter at:
Thank you!!!


